Introduction
There are very many Linux tutorials out there. I have often found them to be a waste of time since without doing useful actions, it's hard to keep the knowledge in my brain. At the same time, some tutorials aimed at a thorough understanding of Linux, namely Linux From Scratch, are infuriatingly hard to get started with. Finally, there are a lot of shorter, more reliable tutorials that don't involve compiling hundreds of packages by hand, but they don't offer explanation of what's going on.
So that is what this is meant to be. Here's why I'm writing this:
- As a reference for myself in building a Linux setup
- As a store of information on what exactly all the various terms mean
- As a guide to others to replicate what I did and go further!
This guide is, above all, meant to be minimal, in that I'm not trying to create a new distro, and thorough, meaning everything should be explained: not just commands, but directories, kinds of filesystems, etc. In addition, very few commands modify your system in a meaningful way: root is only used for a few operations.
I hope you enjoy reading through it as much as I enjoyed writing it!
Prerequisites
Here are some hard prereqs that I'd advise:
- Linux system: you could probably use Windows with MSYS, but there are probably some limitations
of that. You should also have standard tools, like
git, installed. - Modern computer: we're going to be compiling some hefty stuff, without multicore compiling, you could end up having to wait for quite a while.
- Virtualization software: I'm using qemu. With a VM, we can boot from the kernel image directly instead of fiddling around with the actual bootloader.
Here are some skill-based prereqs:
- Building from source: for the majority of projects, just some variation on
./configureandmakeshould be enough, but debugging others' projects is a useful skill. - Comfort with command line: when we're running the kernel, all we have is a command line, so knowing common tools would be helpful. That being said, it's definitely possible to pick up while doing this tutorial.
- Organization: I won't tell you how to organize your stuff unless it matters. Please be sane and remember where you put stuff!
This being said, even if you don't strictly meet the above, I'd say see how far you get! I've tried to make this have a fairly low knowledge requirement. Just trying to learn something leads down a lot of other paths, so go for it!
Typesetting
I know my writing style is verbose. Therefore, I will use some visual aids to break up this block content and make it easier to understand:
Sources
Every programmer builds on the work of others without citing them. I don't really remember all the sources I've used, but here are a few of the most notable:
- A good tutorial in its own right: https://blinry.org/tiny-linux/
- LFS, another useful reference: https://www.linuxfromscratch.org/~xry111/lfs/view/clfs-ng-systemd/index.html
- Short instructions on compiling and booting the kernel: https://github.com/mranv/minimalOS
- Another similar one with more detail: https://github.com/bluedragon1221/minlinux2
- FHS reference: https://refspecs.linuxfoundation.org/FHS_3.0/
- And, of course, Wikipedia!
Minor references:
Creating a Minimal System
This first chapter will build a minimal Linux kernal that you can play around with meaningfully. By that, I mean that I want to be able to run a shell, edit files, and mess around!
However, a decent amount of preparation has to be done up to that point, and there's a lot that can be learnt in that process.
We'll be starting by building the tool that we will be using inside the Linux kernel: busybox.
Busybox
Busybox is essentially all of your standard binary tools wrapped
up into a single binary: from basic tools like ls, mv, cat, to more complex
utilities like sh, vi, awk, and others, to system administration tools, like
chown, crond, and ip. It is incredibly versatile.
Clone it and change to the most recent release (as of writing, 1.36.1):
git clone https://github.com/mirror/busybox.git
git checkout 1_36_1    # switching to the 1_36_1 tag
Now, let's compile it and mess around!
cd busybox
make defconfig    # setup the default config
make
If you have a multicore machine, run nproc to get the number of cores on
your machine and then run make -jn, with n being replaced with the number of
cores: e.g., make -j16. This should significantly speed up your compilation time!
If you are encountering errors in networking/tc.c, this is due to a recent version
of Linux changing the symbols for traffic control. We have no need for traffic control,
so disable it by running make menuconfig, navigating to Networking Utilities and
disabling tc; save your new configuration and run make again.
If you run into an error when running make menuconfig, look for the fix below about that.
You should now have a file labeled busybox: run it with ./busybox. This gives you a whole
ton of output.
Busybox contains a set of applets. Each of these can be run with busybox <applet>. Start
off by running busybox sh, and see what else it can do!
Independence
That being said, can we just copy over this file to any old system and expect it to work? It turns out that this executable is not independent of where you're executing it!
Run file ./busybox. Somewhere in the middle, you should see:
dynamically linked, interpreter /lib64/ld-linux-x86-64.so.2. This is a hallmark of
a dynamically linked program. What does that mean? Let's see:
Run ldd ./busybox. You should see a list of lines of the format library => path.
ldd prints out the shared object dependencies of a program. On my system, I see this:
prajasekar@pradtop busybox $ ldd busybox
	linux-vdso.so.1 (0x00007fc677414000)
	libm.so.6 => /lib64/libm.so.6 (0x00007fc6772f3000)
	libresolv.so.2 => /lib64/libresolv.so.2 (0x00007fc6772e1000)
	libc.so.6 => /lib64/libc.so.6 (0x00007fc6770ef000)
	/lib64/ld-linux-x86-64.so.2 (0x00007fc677416000)
What this means is that busybox expects to find libm (the math library) at
lib64/libm.so.6, and similarly for the other libraries listed! This means that if any of these
libraries are in the wrong place or aren't even on the system, the executable wouldn't
work!
This is a pretty strong constraint on what the new system should look like, and can cause a lot of headaches in setting up a minimal system. The solution to this is static linking.
So what is the difference between static and dynamic? Remember the interpreter line above? Dynamically linked programs use that interpreter to find library functions at runtime, while statically linked programs have the library function compiled into the final executable. This means that statically linked programs are self-sufficient, which is ideal in this situation.
You could by placing the appropriate SO files in the right locations. However, I'll leave that as an exercise to the reader since conceptually, static linking is simpler.
In any case, dynamic linking will be done in the future.
To compile busybox with static linking, run make menuconfig, enter Settings, and enable
"Build static binary".
This seems to be a bug in one of the scripts that improperly checks whether or not ncurses is installed.
To fix, open scripts/kconfig/lxdialog/check-lxdialog.sh and change line 50 from
main() {} to int main() {}.
At this point, you could run make and see if that works. It doesn't work on my system,
but we're going to use advantage of this to download some other repositories that we're going
to use: a libc and the Linux kernel. We're going to be compiling busybox with the help of
these packages.
For a libc, I used Musl, a standards-compliant, performant, and
lightweight libc implementation. Download it from
https://git.musl-libc.org/cgit/musl/
by downloading the musl-<version>.tar.gz. Extract it on your computer using
tar xvf <filename>.
Make a directory called fsroot somewhere; the name really doesn't matter, as long as it's
empty.
Now, make a directory for the library called usr inside fsroot;
this directory has to be called usr.
Then, run these commands in the musl source folder:
# we don't need shared library support:
./configure --prefix=<path/to/fsroot>/usr --disable-shared
make
make install
Now, there is a directory in usr called lib: this should contain the desired libraries,
the files that end in a .a suffix.
The values of the paths will be explained in the next chapter.
We're not done yet: busybox also requires the Linux headers, and right now,
usr/include only contains the libc headers.
So download
the kernel, which we're going to need later anyways.
Run these commands to get the Linux headers:
git clone --depth 1 https://github.com/torvalds/linux.git
make defconfig
make headers
make header_install INSTALL_HDR_PATH=<path/to/fsroot>/usr
After running make headers, there should be a bunch of header files in usr/include in
the linux repository. make header_install ... installs them in the given location with
/include added on effectively. So now, we have all the headers ready!
Now, we have to show busybox where all the library files are: go back into busybox,
run make menuconfig, go
to Settings, and set the field "Path to sysroot" to path/to/fsroot.
Finally, you can just run make.
Now, run file on the new busybox binary: it should say statically linked in the middle.
If you run it, it should behave exactly the same.
We can demonstrate that it's truly independent from the host system using the chroot
command; however,
we first have to start setting up a filesystem hierarchy.
Filesystem Hierarchy (FHS 1)
The Filesystem Hierarchy Standard (FHS) can be found in this document.
Why is this relevant? The FHS is a good guideline of where files are placed on your computer,
especially things at the root of the filesystem. This standard is what defines what goes
in /etc and /dev and all sorts of other stuff!
Here, we're mainly going to be concerned with the /usr directory.
Recall that in the last chapter, we made a usr directory and put a bunch of stuff into
it. The structure of usr should look something like this:
.
├── bin
│   └── musl-gcc
├── include
│   └── ...
└── lib
    └── ...
musl-gcc is irrelevant; the important directories are the other two. In fact,
you'll find them on your own system! Check them out!
The /usr/include directory contains tons of header files, a lot of them for libraries
that you may have installed: think about the -dev or -devel versions of a lot of
packages.
On the other hand, the /usr/lib directory contains tons of SO files, which, as mentioned
earlier, are libraries. We will implement this later, but for now, our lib
directory only contains our static libraries.
We will be creating our FHS-compliant layout within fsroot. In fact, this is what the
sysroot argument on the previous page referred to: sysroot expects a psuedo-root that
contains the headers and libraries in the expected places. prefix serves a similar purpose.
Before we proceed with putting additional stuff inside fsroot, let's first see what it
would look like if fsroot was actually the root.
Chroot
Chroot is a program that allows you to imagine that a particular directory is the root directory: nothing outside of that directory is accessible.
A standard disclaimer made when mentioning chroot is that it isn't a sandbox! There are ways to get out of a simple chroot jail.
Copy the statically-linked busybox into fsroot. Then run sudo chroot path/to/fsroot /busybox.
You should see the standard help message of busybox. Now, to actually get a shell,
run sudo chroot path/to/fsroot /busybox sh.
You may notice that while shell builtins, like cd and echo work, programs like ls do not.
This is because these programs are usually binaries stored somewhere on PATH; check out your
PATH with echo $PATH. None of these directories exist except /usr/bin, which contains a
dynamically linked file anyways! So we effectively have nothing on path.
A temporary workaround is to prefix everything with /busybox: e.g. /busybox ls.
Let's put something on PATH so
that we can actually use the shell normally.
Another workaround, which I'm not going to show here, is to enable busybox's standalone shell options, directions for which can be found in the INSTALL file in busybox's repository. This mode defaults to running busybox applets when the binary can't be found.
While still in the chroot environment, run these commands:
/busybox mkdir bin
/busybox --install -s bin
Here, we create a directory /bin, then run busybox's installation program, which creates
symbolic links to itself from the name of every applet it provides: e.g. it symlinks
/bin/ls to itself, /busybox. This works because busybox is a multi-call binary, which
analyze what name they are called under to determine what function to execute.
Now, we can interact normally in the chroot shell! Run ls /bin -l to see how the installed
applets are actually symlinks!
We have created a relatively isolated system filesystem here; now all that remains is to boot it!
Booting the Kernel
This is surprisingly relatively simple! However, it is very finickey, so be sure to follow the instructions below precisely to end up with a working result.
If you feel that you have messed around a lot and nothing's matching up with what it should be, the
command make mrproper will revert your linux directory back to what it was when you first cloned it.
Compiling the Kernel
First, to boot the kernel, we need to compile the kernel! The kernel is very customizable,
and, for now, we don't need all of its features, so enter the Linux directory and
run make tinyconfig. This creates a basic configuration that we can now edit with
make menuconfig.
Now, follow these instructions:
- Enable Device drivers → character devices → TTY
- Enable General setup → configure standard kernel features (expert users) → printk support
- Enable 64-bit kernel
- Enable General setup → initramfs support
- Disable all the compression options except gzip, since that is the compression tool that we will be using.
- Enable Executable file formats → ELF binaries and Executable file formats → scripts starting with #!
For now, this is the configuration that we will be using. Save your changes by exiting.
Compile with make; recall that you can use multiprocessing to speed up compilation. Now, just to test things out,
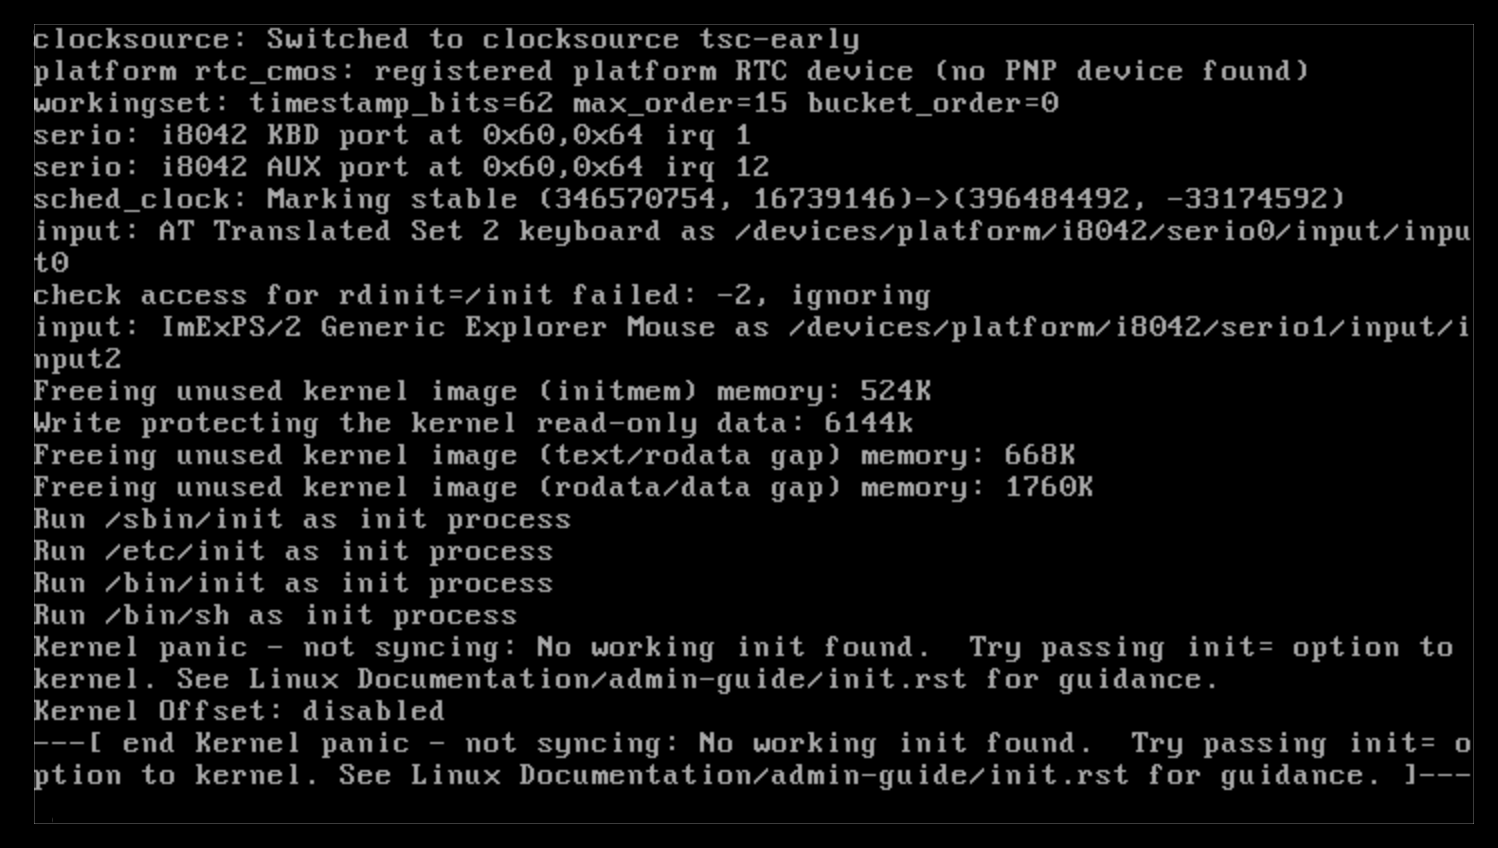
run the kernel with qemu by running qemu-system-x86_64 -kernel arch/x86_64/boot/bzImage; there should be some
output and then you should see a screen like this:
So what did we just do?
tinyconfig, as mentioned before, gives us the bare minimum we need to boot the kernel. This lets us compile it
pretty fast and customize it to do what we want. However, it leaves a lot of stuff out.
For starters, by default, it doesn't come with TTY drivers. Since a TTY is basically the terminal, without this driver, the kernel wouldn't be able to print anything out!
We'd also probably like some sort of debugging tool that's telling us what's going on; this tool is printk.
printk is essentially a C function similar to printf; it is slightly different and is modified for the
kernel's purposes. You can actually see the kernel's output on your own computer with the dmesg command!
This command reads the /dev/kmsg device, where the kernel outputs its logs, and prints it out for you.
Finally, since most devices are 64 bit, it makes sense to compile a 64 bit kernel since otherwise, we would not be able to move binaries from the host computer into the VM without the use of a cross-compiler, which is, frankly, a pain.
What about the other options? Well, we'll see soon enough!
Initrd
If you read the error message, you'll find that the kernel's saying that it can't find an init. init is
the first process that is run on a linux system; it has the process identifier (PID) of 1. In fact, you can
find that process on your own computer: ps --pid 1 yields the init process on your computer. On most modern
computers, this should be systemd.
Our simple linux computer, however, lacks an init program (not technically true, but we'll get into this in the
next chapter)! Let's make a simple init program: navigate into your filesystem root directory, and create the
following file at the root of that directory with the name init:
#!/bin/sh
echo "Hello, world!"
Run chmod +x init to make it an executable (this was why we enabled the kernel option to recognize scripts
starting with a hashbang as executables).
Now that we have this init file, how do we actually let the kernel load it? We have to turn it into an initramfs: an initial ram filesystem.
Although in this tutorial, we have complete knowledge about the (virtualized) hardware we are running our OS on, OS images targetted at a wider range of people have to remain adaptable to the presence of different hardware: depending on what devices are detected, different drivers will be loaded.
Placing this logic in the kernel code is inelegant and hard to maintain. Instead, an initramfs is created to contain all the tools that may be needed, and the kernel is booted with access to the initramfs; then, normally written code, like a shell script or an executable, can detect hardware and load the necessary modules.
The normal boot procedure of a Linux system will be covered later, but, for now, all that you need to know is that an initramfs offers a convenient way of providing a root filesystem, but it doesn't offer a means of actually interacting with any hardware.
Here, we will be manually creating an initramfs, or an initrd (initial ramdisk), but there are
other tools such as dracut and mkinitcpio.
An initramfs is a variety of cpio archive; think of it as a program like tar. cpio takes a bunch of paths as input and prints out the archive on its output. We'll also be compressing it, as a good practice; strictly, this shouldn't be necessary, but as the filesystem grows, it is beneficial to keep the size of the archive lower. As stated above, we'll be using gzip.
To perform these tasks, run the following command in the filesystem root:
find . | cpio --create --verbose --format=newc | gzip --best > ../initrd
The format argument passed to cpio basically tells it to use the new version of the cpio file format.
Now, we have an initrd file in the parent folder, and all that remains is booting the kernel with this initial filesystem!
Running our shell
This step is the simplest of them all if you've been following along correctly! With qemu being installed, run:
qemu-system-x86_64 -kernel path/to/bzImage -initrd path/to/initrd
If all goes well, you should see something like this:
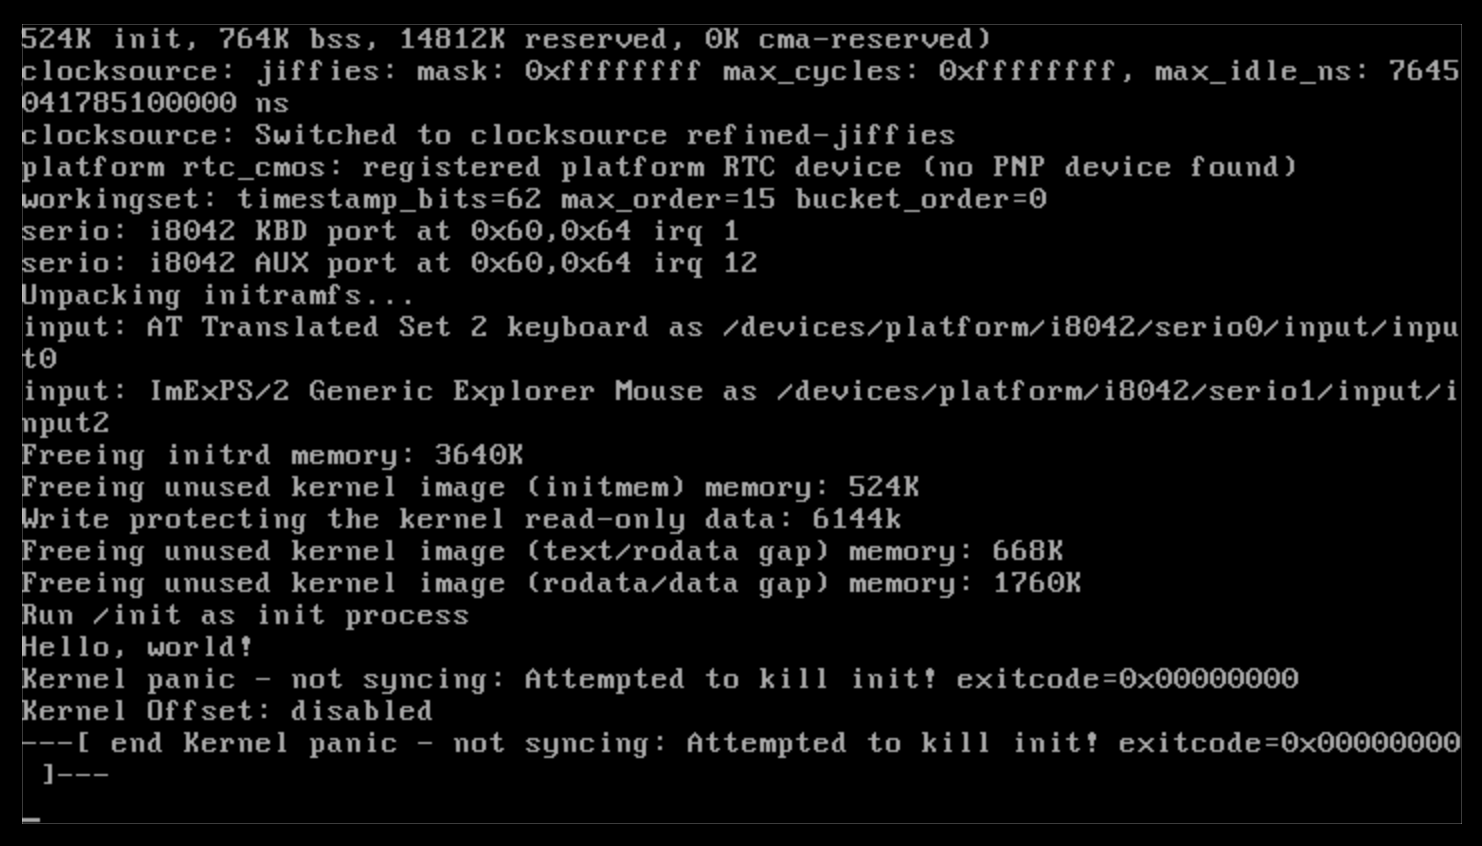
If you see a "Hello, world!" in your output, congratulations! You've pretty much built a
minimal system! All you need to do to get a shell is to replace that echo "Hello, world!"
line in the init file with something like sh, recreate the cpio archive,
and you'll be good to go!
If you can do this successfully, great! Our minimal system is done. But this was probably less educational than you hoped: if you're like me, you've probably never even interacted with any of these tools or components of your operating system!
Don't worry: right now, we're starting out at the bottom level. As we begin to climb out, more things will start to seem familiar! So let's start the ascent!
Expanding the System
Now that we have the kernel set up, we'll be starting to move towards using modern tools and accepted practices. However, we'll not be implementing the complete Linux booting process until some time after. For now, we'll focus on some important parts of your interaction with Linux without worrying about exactly how it fits into how modern systems work.
These following sections are where you're going to see some familiar
things, or maybe files that you've heard of but never really understood:
fstab, inittab. We'll also skim networking for a bit, a topic that
people -- me included! -- don't really understand unless they have
a particular interest in the topic.
Let's start by modernizing our init process to reflect something that actual distributions use.
An Init System
As I mentioned before, the init process is the first process started by the Linux kernel; most modern computers use systemd for this, and we will too, later in this book. For now, however, we will be using Busybox's built-in init system.
This book is meant to show current practices; this is why systemd will be shown in the future. That being said, systemd has been criticized for not adhering to the Unix philosophy: that each tool should do one thing, and do it well; instead, critics claim that systemd handles too many tasks at the same time.
Personally, I dislike how systemd obscures what exactly is going on: systemd is
managed through commands like systemctl instead of editing files, as we'll see,
and logs are viewed through journalctl instead of just viewing files. That
being said, systemd is used for its extensive parallization capabilities and
versatility.
Although we will be using Busybox's init system, note that the following syntax is also used by most of systemd's competitors, including OpenRC (used by Alpine and Gentoo) and runit (Void).
The primary advantage of using an init system over a simple shell script is that init systems generally possess the capability to run multiple tasks at the same time, run tasks at particular.
If you looked in the bin folder, you'd have found another init program; if you
switch into a chroot environment or enter the VM and run init, you'd run into
an error: init: must be run as PID 1. If you run init -h, you helpfully
see that "It (re)spawns children according to /etc/inittab." So, let's take a
look at the format of /etc/inittab.
Inittab
The inittab file consists of multiple lines with the following format:
id:runlevel:action:process
Let's explain each of these fields:
- id: in busybox, this refers to the tty that the service will run on. For us, we
will keep it blank so that it refers to
/dev/console, or the default - runlevel: a runlevel is essentially a state that the computer is operating in; for example, runlevel 0 is powered off, 1 is single user mode, 6 is reboot, and there are others. Busybox does not support runlevels, so this will also be blank.
- action: this is an event that the operating system will give us. Some available
actions are:
sysinit,askfirst(which will ask the user first),shutdown, andctrlaltdel(which fires on ctrl-alt-delete) - process: this is the actual process that will be run.
In a lot of cases, it is preferable to write a script instead of directly running
a binary from the inittab; these scripts are stored in the /etc/init.d directory.
Let's write a basic init! We will be revising some of the stuff we do here in
subsequent chapters.
A basic inittab
Make the etc folder in your filesystem root, and there,
place this inittab into /etc/inittab:
::sysinit:/etc/init.d/rcS   # Initialize system
::askfirst:/bin/sh          # Start shell when user presses enter
Now, make the directory init.d and make the new file rcS: this is the standard
name for the file that initializes the system. In it, let's just place a simple
hello world message:
#!/bin/sh

echo "Hello, world!"
chmod +x rcS, delete our old init file, and pack the entire directory into an initramfs, then boot the kernel
as before. Now, you should see "Hello, world!" and a prompt that says "Please press Enter to activate this
console"; if you press enter, you should see something like this:
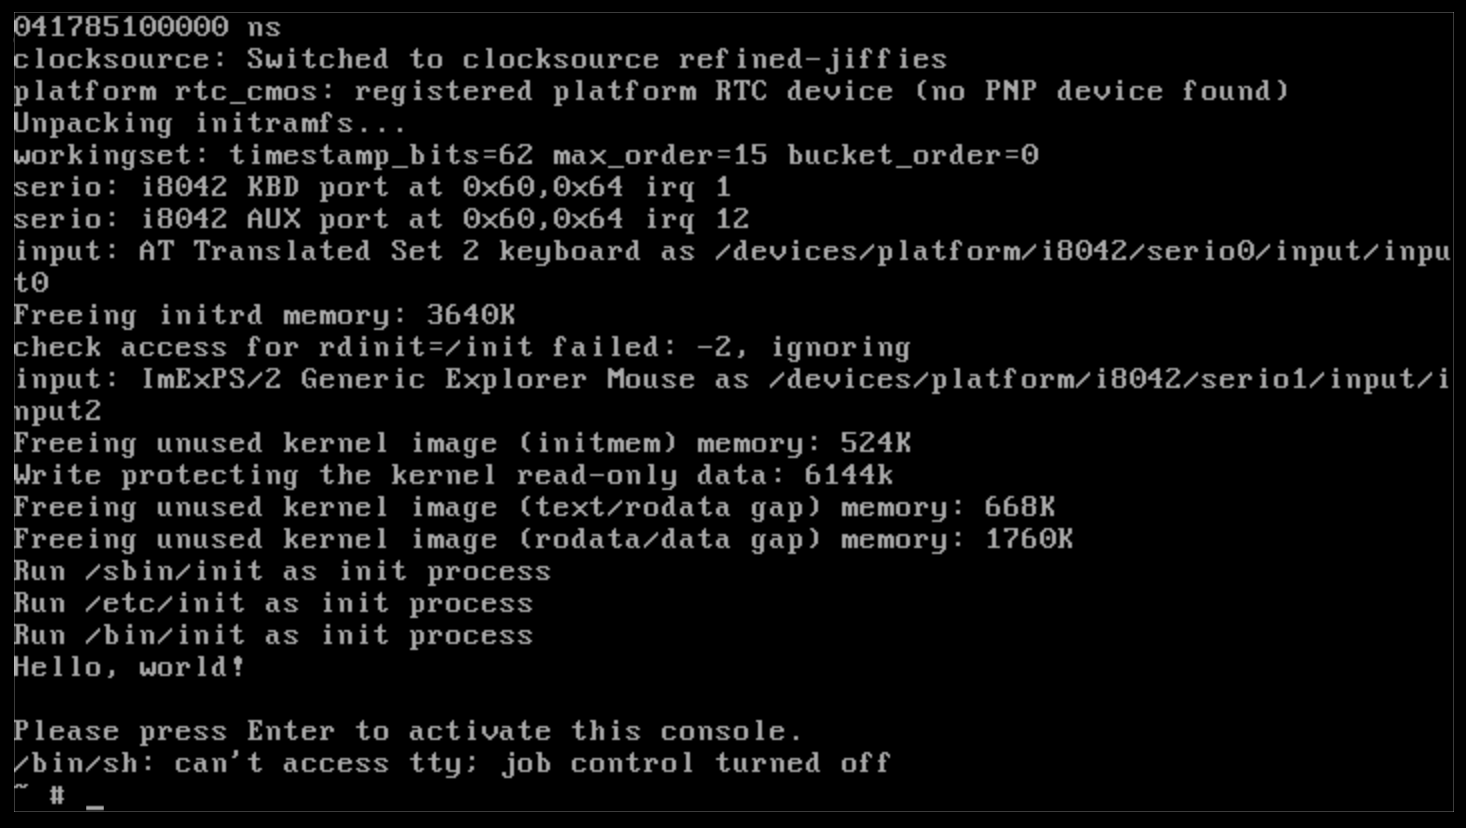
If so, hurray! We've just started setting the basic building blocks towards our final Linux system!
Next, we're going to put the init system to actual use by mounting (pseudo)-filesystems.
(Pseudo)-Filesystems (FHS 2)
Now, we're going to start adding some more directories to the root filesystem. Unlike before,
these directories won't actually hold files: instead, they are pseudo-filesystems, meaning
that their contents will be dynamically created and managed by the kernel. We will first be looking at
the /proc and /sys directories.
Proc and Sys
We need to enable support for generating these directories in the Linux kernel; enable
File Systems → Pseudo filesystems → /proc file system support and
File Systems → Pseudo filesystems → sysfs filesystem support. Then, recompile your kernel.
Make a /proc and a /sys directory at the root of your filesystem, and recompress it into a ramdisk.
Then, enter your system.
If you type ls /sys or ls /proc, you will see nothing. This is because, like any external filesystem,
we need to mount it; most familiarly, we need to mount USB drives, but the mount command is fairly general,
and we need to use it in this case to actually access the "files" in the sys and proc filesystems. Run
these commands:
mount -t sysfs sys sys
mount -t proc proc proc
If you look at the manual, you'll see that mount takes a type argument -t, a device, and a mount point;
although the type argument is usually optional, we need to provide it here.
In any case, you can verify that the /proc/ and /sys directories are no longer unpopulated. So, what do they
contain?
/proc is the more relevant of the two directories: this directory contains information about every executing
process, and a little more besides. For example, we can list all the mounted objects by looking at the file
/proc/mounts (easily accessed by just running mount with no arguments). There is also /proc/kmsg which
contains kernel logs (much like /dev/kmsg discussed earlier).
Inside each numbered directory, we can find details about each executing process by PID. You can find a list
of executing processes and their PIDs with ps. Here are some interesting
files:
cmdline: contains the command executed (if there was one) to start this processcwd: a symlink to the processes "current working directory"exe: a symlink to the process that is executingfd: a directory containing the file descriptors a process is holding and so on. Here is the full documentation of the contents of the/procdirectory.
What about /sys? This directory contains less useful data; it is mainly a way to access data from the
kernel. Since this tutorial aims to go from the kernel up, we're not going to be looking in detail at what
it contains. Similar to the previous directory, the full documentation can be found on the kernel website
here.
fstab
In any case, note that we had to manually mount these two filesystems. These aren't the only filesystems there
are: at some point, we have to mount the hardware to get off of the RAM! Although we can simply put everything in
the init script, there is a more modular way to do it: an fstab.
Create the file /etc/fstab with the following content:
# device-spec	mount-point	fs-type		options		dump	fsck
proc		/proc		proc		defaults	0	0
sysfs		/sys		sysfs		defaults	0	0
(the first line isn't strictly necessary). You can see that this file contains a lot of the information we
had manually provided to the mount command: we give it a point to mount to, its type, and the name of the
filesystem. If this file exists, running mount -a will mount everything in the fstab. Therefore, after
making this file, we can edit our /etc/init.d/rcS to run mount -a, and this will let the machine
automatically mount these two pseudo-filesystems before we even receive access to the terminal.
TODO: add tmpfs and devpts